Google Chrome is one of the most reliable browsers available, but over time it can begin to lag, freeze, or slow down especially on Windows 11. This usually happens because of background processes, too many open tabs, or overloaded extensions. The good news is that you can restore Chrome’s speed in just a few minutes with the right steps.
1. Close Unused Tabs and Background Processes
Each Chrome tab uses memory (RAM). Keeping too many open will slow your system.
- Press Shift + Esc to open Chrome’s built-in Task Manager.
- Identify tabs or extensions consuming high memory.
- Select and click End Process on unnecessary ones.
Tip: Use bookmarks or tab groups to save pages instead of keeping them open.
2. Disable or Remove Unnecessary Extensions
Extensions run in the background and consume system resources.
- Type chrome://extensions/ in the address bar.
- Toggle off or remove the extensions you rarely use.

Recommendation: Keep only essential extensions such as ad blockers or password managers.
3. Clear Cache and Browsing Data
Cached files and cookies can accumulate and slow Chrome down.
- Go to Settings → Privacy and Security → Clear Browsing Data.
- Select Cached images and files and Cookies and other site data.
- Click Clear Data.
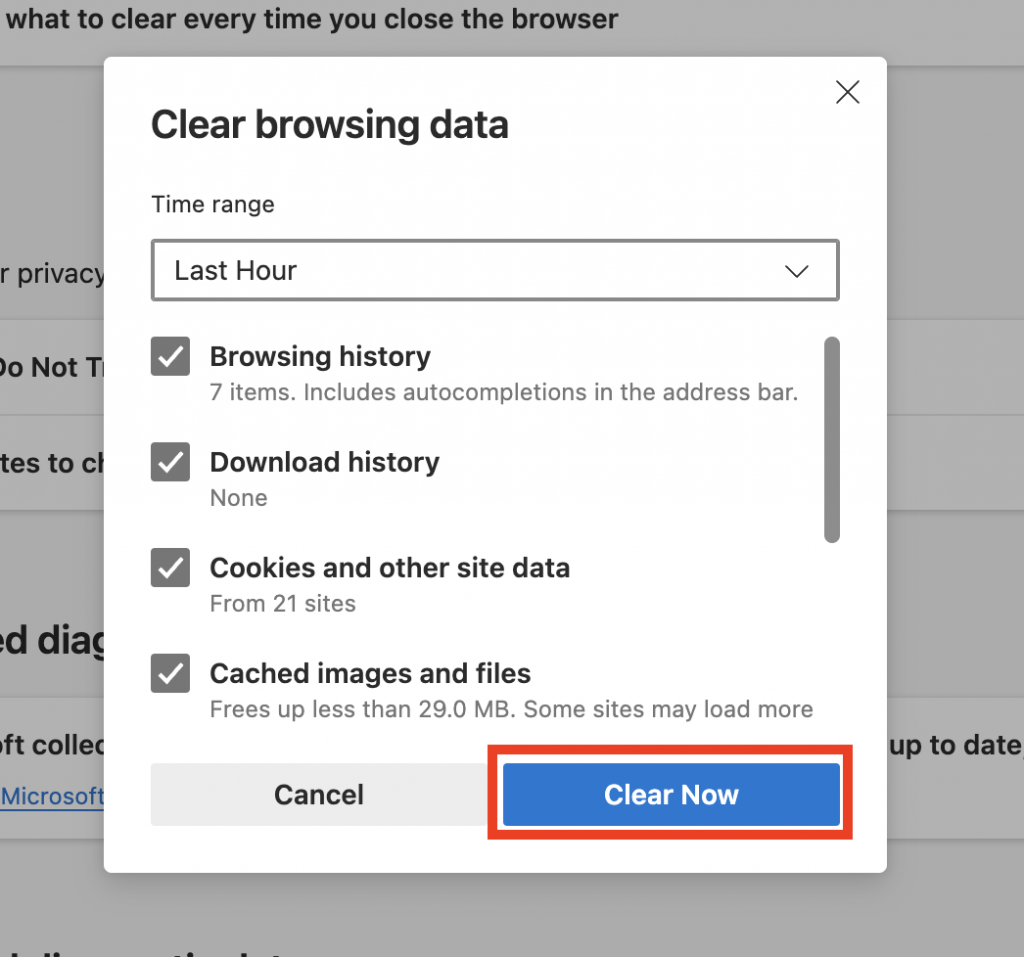
Pro Tip: Do this every few weeks to keep performance smooth.
4. Enable Hardware Acceleration
Hardware acceleration lets Chrome use your computer’s GPU for better graphics performance.
- Visit chrome://settings/system.
- Turn on Use hardware acceleration when available.
- Restart Chrome afterward.
If issues persist, try disabling it again to compare results.

5. Update Chrome and Windows 11
Outdated software can slow down your system.
- In Chrome, go to Settings → About Chrome to check for updates.
- In Windows 11, open Settings → Windows Update → Check for updates.
Regular updates often fix bugs and improve speed.
6. Disable Startup Programs
If Chrome takes long to start, background startup apps might be loading simultaneously.
- Press Ctrl + Shift + Esc to open Task Manager.
- Click the Startup tab.
- Disable unnecessary programs from launching at startup.
This reduces system load and improves Chrome’s launch speed.
7. Reset Chrome Settings
If Chrome still feels sluggish, restore it to default settings.
- Go to chrome://settings/reset.
- Click Restore settings to their original defaults.
This removes problematic configurations and unwanted changes while keeping bookmarks intact.
8. Scan for Malware or Heavy Apps
Malware or hidden background apps can cause performance drops.
- Run Windows Security → Virus & threat protection → Quick scan.
- Use Chrome’s cleaner by typing chrome://settings/cleanup and selecting Find.
Cleaning your PC ensures Chrome runs without interference.
9. Use Chrome’s Performance Settings
Chrome now includes built-in optimization tools.
- Navigate to Settings → Performance.
- Enable Memory Saver and Energy Saver.
These tools automatically pause inactive tabs and conserve resources.
10. Use a Lighter Theme or Profile
Heavy themes and multiple profiles can drain Chrome’s memory.
- Switch to the default theme under Appearance.
- Delete old profiles under chrome://settings/people.
A clean look often means faster performance.
SUMMARY
- Close unused tabs and background apps
- Remove unnecessary extensions
- Clear browsing data regularly
- Turn on hardware acceleration
- Keep Chrome and Windows updated
- Use built-in performance and cleanup tools
Final Thoughts
A lagging browser doesn’t always mean your PC is slow it often just needs a bit of cleanup. With these simple fixes, Chrome will run as fast as the day you installed it.
If performance issues continue, test Chrome Canary, Brave, or Microsoft Edge to see which browser suits your workflow best.